It may only be the last day of February but there is diffidently an air of spring about.
I've been out in the garden doing the spring clean and clear. This is this gardens second year so at lot of the plants I put in last year should coming back again this year.
I've added in some early flowering bulbs and corns so this time next year there will be even more colour.
This is my hellebore its about doubled in size since last year. I have a white and pink one aswell but that ones not looking too good the leaves look like they've been eaten by something.
The anemones I planted last year are already starting to come up already. These did so well that I'm going to put some more in but I'm waiting to see what plant offer lidl get in.
The pond is a bit of a mess, full of duck weed and dead leaves. Its a full weekend job I think as I want to put some structure from the back of it so the liner isn't showing anymore.
It was nice to take a few days of work and get the garden set up for the spring. I have ahd a awful lot of crochet projects on at the the mo and its been pretty none stop.
In between commissions I've been working on some pt projects of my own.
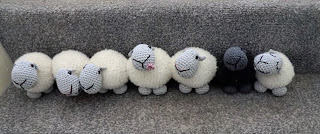
This idea started as I needed a draught excluder for the back door. Its a bit of an old fashioned thing and I wasn't really liking any I could find in the shops and online.
I thought I could think of a good crochet solution and after seeing a lot of rows of beach huts and house I thought a row of animal would be a cool idea.
I decided to go for sheep pretty quickly. I wanted a back sheep but struggled to find a fluffy yarn brand that had a dark grey or black. Not surprising really, these yarns are normally in baby colours and soft pastels. Black doesn't sit well in that type of colour pallet.
I thought if I couldn't find a black I could have the sheep all different pastel colours or have one of the sheep facing the wrong way, but luckily I the drop yarn.
The bodies of the sheep are made in one piece, then the heads and feet are sewn on. I had great fun giving each little sheep its own character. The one at the end is asleep, two of them are kissing and one is chewing a flower :)
If you want the pattern for this it is available in my etsy shop here
I've also been working on some more tea cosys for my pattern collection.
This first one is an afternoon tea, tea cosy. Its blue striped cobble stitch and covered in cakes.
On top there is a swiss roll, battenburg cake, strawberry cupcake and bakewell tart.
No pattern for this one yet I've a few to type up and test then I'll be adding them to my etsy shop.
This one is a simple one. Again in cobble stitch so it has a lovely texture this one is cover in lots of pastel stars. For this I developed a new way of making flat crochet starts. Its ridiculously easy but it makes a perfect little star every time.
I'm debating making 12 teacosys and turning them into a calendar as I have a half finished Christmas pudding one and a bee hive in the making. So I only need to think of another six and its done.
It might be one of those things that doesn't happen for a while as I have some big commission projects coming up and they always push my pet projects to the sidelines.
I have some pics of the few latest magazine projects to share but I'll save them for my next post.
till then happy crocheting xxx
Monday, 29 February 2016
Wednesday, 17 February 2016
seahorse amigurumi free pattern
Here is the free pattern from last Sundays live tweet
see previous post for step by step making guide
see previous post for step by step making guide
Seahorse
You will need:
4ply yarn green and blue
3mm crochet hook
Wool needle
Toy stuffing
Abbreviations
Sl st –slip stitch
dc – double crochet
htr – half treble crochet
tr – treble crochet
st/sts – stitch/stitches
dc2tog – double crochet the next two
stitches together
Back fin
Make one in green yarn
Make a magic ring and work 4dc into the
ring. sts
Rnd 1: (dc in the first st, 2dc in the next
st) repeat to end. 6sts
Rnd 2: (dc in the first two sts, 2dc in the
next st) repeat to end. 8sts
Rnd 3: (dc in the first three sts, 2dc in
the next st) repeat to end. 10sts
Round 4: dc in each st to end. 10sts
Fold the circle in half so there is two
rows of five stitches. Work the next row through both rows to close the gap and
create a decorative edge.
Row 1: (ch3, dc in next st) repeat to end.
5sts, 5 ch loops
Fasten off.
Back fin
Make one in green yarn
Make a magic ring and work 4dc into the
ring. sts
Rnd 1: (dc in the first st, 2dc in the next
st) repeat to end. 6sts
Rnd 2: (dc in the first two sts, 2dc in the
next st) repeat to end. 8sts
Fold the circle in half so there is two
rows of four stitches. Work the next row through both rows to close the gap and
create a decorative edge.
Row 1: (ch3, dc in next st) repeat to end.
4sts, 4 ch loops
Fasten off
Back spines
This part is work along a chain rather than
in the round
Make one in green yarn
Ch 25
dc in 2nd Ch from hook, htr in next st,
Ch2, sl st in next st, (dc in next st, htr in next st, Ch 2, sl st in next st)
repeat to end along ch
fasten off
Head and body
Starts at the tip of the nose and works
down. Stuff as you go along.
Make a magic ring and work 6dc into the
ring. 6sts
Rnd 1-3 : dc in each st to end
Rnd 4-6: 2dc in the first st. dc in each st
to end. 9sts at end of round 6
Rnd 7: (dc in the first two sts, 2dc in the
next st) repeat to end. 12sts
Rnd 8: (dc in the first st, 2dc in the next
st) repeat to end. 18sts
Rnd 9: (dc in the first two sts, 2dc in the
next st) repeat to end. 24sts
Rnd 10: (dc in the first three Sts, 2dc in
the next st) repeat to end. 30sts mark this round with a stitch marker
Rnd 11: (dc in the first four sts, 2dc in
the next st) repeat to end. 36sts
Rnd 12-14: dc in each st to end. 36sts
Paus to insert toy eyes on the marked round
14sts apart
Rnd 15: (dc2tog, dc in next four sts)
repeat to end. 30sts
Rnd 16: (dc2tog, dc in next three sts)
repeat to end. 24sts
Rnd 17: (dc2tog, dc in next two sts) repeat
to end. 18sts
Rnd 18: (dc2tog, dc in next st) repeat to
end. 12sts
Rnd 19: (dc2tog) repeat to end. 6sts
Rnd 20-24: dc in each st to end. 6sts
Rnd 25: (dc in the first st, 2dc in the
next st) repeat to end. 9sts
Rnd 26: (dc in the first two sts, 2dc in
the next st) repeat to end. 12sts
Rnd 27: (dc in the first three Sts, 2dc in
the next st) repeat to end. 15sts
Rnd 28: (dc in the four sts, 2dc in the
next st) repeat to end. 18sts
Rnd 29: dc in each st to end. 18sts
Rnd 30: (dc in the first five sts, 2dc in
the next st) repeat to end. 21sts
Rnd 31: dc in each st to end. 21sts
Rnd 32: (dc in the first six sts, 2dc in
the next st) repeat to end. 24sts
Rnd 33: dc in each st to end. 24sts
Rnd 34: (dc in the first seven sts, 2dc in
the next st) repeat to end. 27sts
Rnd 35: dc in each st to end. 27sts
Rnd 36: (dc in the first eight sts, 2dc in
the next st) repeat to end. 30sts
Rnd 37: dc in each st to end. 30sts
Rnd 38: (dc in the first nine sts, 2dc in
the next st) repeat to end. 33sts
Rnd 39: dc in each st to end. 33sts
Rnd 40: (dc in the first ten sts, 2dc in
the next st) repeat to end. 36sts
Rnd 41-45: dc in each st to end. 36sts
Rnd 46: (dc2tog, dc in next four sts)
repeat to end. 30sts
Rnd 47: (dc2tog, dc in next three sts)
repeat to end. 24sts eyes
Rnd 48: (dc2tog, dc in next two sts) repeat
4to end. 18sts
Rnd 49: (dc2tog, dc in next st) repeat to
end. 12sts *stuff now*
Rnd 50: (dc2tog) repeat to end. 6sts
Rnd 51-80 : dc in each st to end
Fasten off and sew closed hole in base
Sew on fins and back fins as per photo to
finish
We don't have a name for this guy yet so please comment with your suggestions
thanks
Liz xxx
Tuesday, 16 February 2016
New seahorse design live tweet feed
For this Sundays live tweet I decided to take the pattern of the week and totally redesign it. This is the live tweet feed from sketch to completion.
Link to free pattern x


Link to free pattern x


Friday, 12 February 2016
Micro crochet spider live tweet feed
Last weeks pattern of the week was Parker the spider.
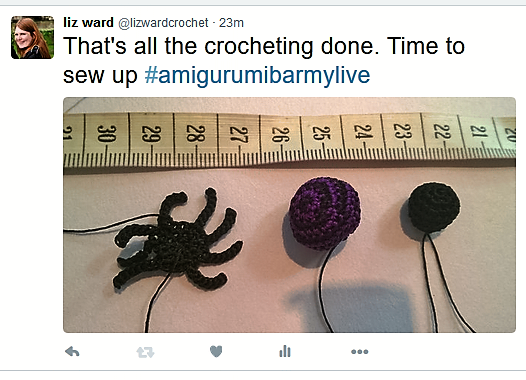
I made my rainbow of spiders. I did however leave me with nothing to make for the live tweet. I decided it might be quite cute to make a tiny spider and share how I create micro crochet.
Below is the tweet feed from Last Sunday. Join me again this sunday at 10am were I'll be making a seahorse. Follow @lizwardcrochet on twitter or ~amigurumibarmylive
If you are not on twitter you can catch up with the feed here on the blog next week. You can also email me any questions and I'll answer them during the live tweet xxx
Shortly after this last shot was taken I tried taking more photos of the complete spider. Cassi stole it, had a mad half hour playing with it the lost it. Combing cats and crochet has its complications.
See you next Sunday
Happy crocheting
love
Liz
Pattern can be found here
I picked this pattern as I wanted to remake it for the live tweet feed and take some more up to date photos. I was a bit restless and couldn't wait till Sunday so this happened...
Below is the tweet feed from Last Sunday. Join me again this sunday at 10am were I'll be making a seahorse. Follow @lizwardcrochet on twitter or ~amigurumibarmylive
If you are not on twitter you can catch up with the feed here on the blog next week. You can also email me any questions and I'll answer them during the live tweet xxx
my email is amigrumibarmy@gmail.com
all questions about amigurumi and or crochet are welcome
Live tweet feed Parker the spider micro crochet
Shortly after this last shot was taken I tried taking more photos of the complete spider. Cassi stole it, had a mad half hour playing with it the lost it. Combing cats and crochet has its complications.
See you next Sunday
Happy crocheting
love
Liz
Subscribe to:
Posts (Atom)


